Replacing a garage door is more than picking a style and color. The door, tracks, springs, and opener must fit the space you actually have, not the space you wish you had. Width and height measurements are only the starting point. Headroom above the opening, backroom toward the rear wall, and side room beside the tracks determine whether you will need standard hardware, a low headroom kit, or a different lift configuration. Getting these details right prevents binding, noisy operation, and delayed installations caused by incompatible parts arriving on site.
-
Measure the space that the controls fit: opening, headroom, backroom, and side room.
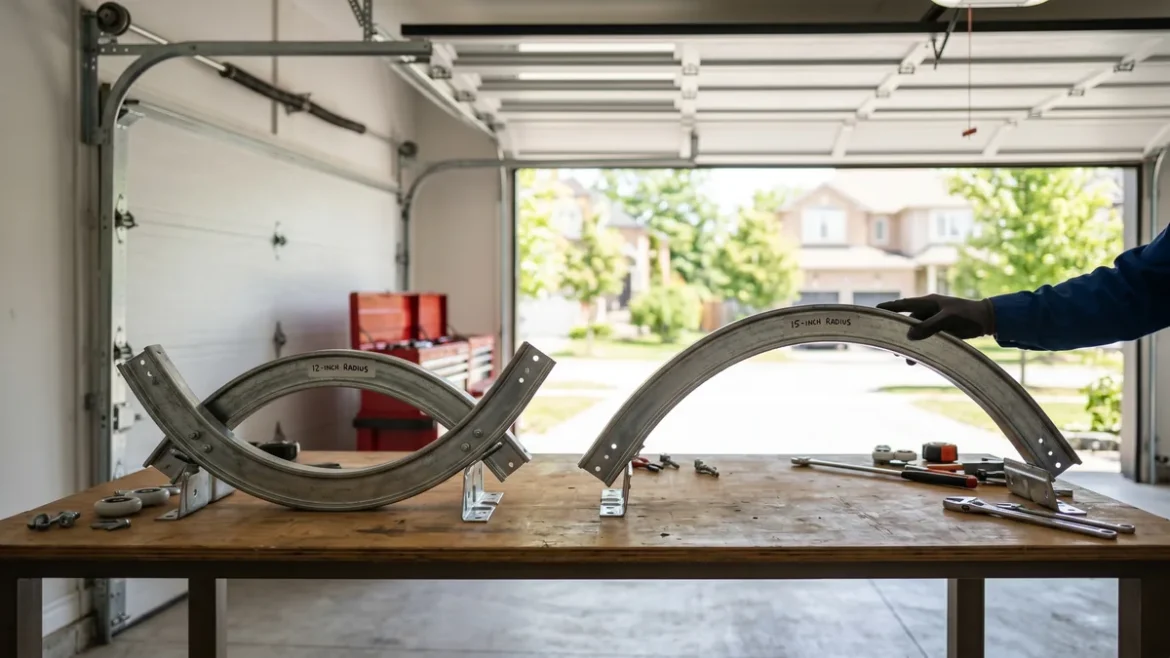
Start by measuring the finished opening width and height at three points each to catch out-of-square framing. Then measure headroom from the top of the opening to the lowest obstruction, such as a ceiling joist, steel beam, or duct. Many residential doors use a 12-inch track radius, so you need enough headroom to clear the top section and accommodate a torsion spring tube. If your measurement is tight because of low ceilings or a dropped beam, a local Garage door supplier can confirm whether a low-headroom double-track setup or different lift is appropriate for that space.
Next, check the backroom: the distance from the garage door opening back to the nearest obstruction. You need room for the horizontal tracks, the fully open door, and the opener rail. Limited backroom can force a smaller track radius, which makes the door turn sooner but increases running resistance. Finally, confirm side room on both sides for the vertical tracks, flag brackets, and cable drums. While you are there, look at the floor under the door. A sloped or crowned slab can cause gaps even when the panels fit, which means you may need a different bottom seal or minor floor work to achieve a tight close.
-
Match spring and track configuration to your clearance.
Most modern residential systems use torsion springs mounted above the opening on a shaft with cable drums at each end. Torsion systems generally run smoother and keep the door better balanced than extension springs, but they require enough headroom for the shaft, center bearing plate, and 12- or 15-inch track radius. When headroom is scarce, a low headroom kit adds a second top track and special top fixtures that let the upper section tuck under sooner. The trade-off is more components to adjust and slightly higher friction in the turn.
If your ceiling is tall and you want the door to open higher off the floor, a high-lift track increases vertical travel before the radius starts. This changes spring geometry and drum size, so you must match spring sizing and cable length precisely. A common mistake is reusing old tracks or springs with a new door. Weight and lift differ by panel construction, insulation, and windows, so old hardware can be undersized. Beyond performance, mismatched hardware is a safety hazard because springs and cables are under high tension.
-
Balance door weight with insulation, wind rating, and hardware sizing
Insulated doors with polyurethane foam in place cores feel solid and quiet, and they improve temperature control, but they weigh more than uninsulated pan doors or polystyrene-backed panels. Added weight means thicker spring wire, more turns on the winding cones, and sometimes additional struts to keep wide sections from bowing. In regions that require higher wind load ratings, you may also need heavier hinges, extra reinforcement, and even 3-inch track for oversized or especially heavy doors. The practical trade-off: more insulation and stiffness usually improve comfort and durability but require correctly sized springs and, in some cases, a beefier opener bracket to prevent the top section from flexing.
Steel thickness and hardware choice matter too. Thicker exterior skins resist dents from bikes or lawn equipment but add mass. Nylon rollers with ball bearings are quieter than plain steel rollers and reduce track wear, especially on 15-inch radius turns. For openers, many homeowners gravitate to higher horsepower to mask a heavy door. In reality, a properly balanced door should stay in place at mid travel when disconnected from the opener. If you need a powerful motor just to lift it, the springs or tracks don’t match the door weight. Picture an insulated 16-foot door with a row of windows: it should glide on correctly sized rollers and springs, not grunt its way up.
-
Confirm opener and safety device compatibility before ordering.
Opener choices bring their own fit requirements. A belt-drive unit runs quieter than a chain drive, and DC motors offer soft start and stop, which reduces stress on hinges and struts. A 7-foot door often needs a standard rail, while an 8-foot door may require a rail extension kit. Make sure the top section includes an opener reinforcement bracket so the arm pulls on a rigid plate rather than thin panel skin. Test-fit considerations include clearance for the operator rail under low beams and proper placement of photo eyes near the floor so storage or a curb at the slab edge doesn’t block them.
When overhead space is limited, or you want the center of the ceiling clear, a wall-mount jackshaft opener can drive the torsion tube from the side. This setup frees the space above the door and avoids conflicts with a torsion spring shaft in front of the header. It does require a true torsion system, solid end bearing plates, and room beside the cable drum for the motor and coupler. Many of these units integrate a cable tension monitor and automatic deadbolt lock, but they still rely on a well-balanced door. If photo eyes are misaligned or the door drags in the tracks, no opener type will perform correctly.
Use a pre-install checklist and plan the first year of maintenance.
Before installation day, check that jambs and the header are sound, straight, and anchored to studs or masonry. Lay out the track radius you intend to use, and confirm solid blocking for angle-iron supports to hang the opener and horizontal tracks. After the panels go in, verify hinge numbers are in the correct locations, struts are fastened tight, and drums are torqued with cables seated in all grooves. A common failure point is reusing bent tracks or flattened rollers, which can make the door bind and jump. Align weatherstripping to seal without dragging and confirm the door balances when the opener is disconnected.
After installation, run a safety reversal test and confirm the manual release works smoothly. Lubricate steel roller bearings, hinge barrels, and torsion spring coils with a garage door-rated spray; do not grease the tracks. Recheck set screws on the drums and spring cones after a few weeks of use and inspect lift cables for fraying near the bottom brackets. Replace a cracked bottom seal if daylight appears under the center or corners. Plan an annual tune-up to check spring balance, photo eye alignment, track plumb and level, and fastener torque so small issues don’t turn into noisy operation or premature wear.
Good measurements and realistic constraints drive smart garage door choices. When you match headroom, backroom, and side room to the right track radius, lift type, and opener, the door runs smoother, lasts longer, and closes with a reliable seal. If your space includes low ceilings, tight corners, or a sloped slab, sketch those details and discuss them with an experienced installer before ordering hardware. A careful plan beats guesswork, and it makes installation day feel routine instead of a scramble for parts you didn’t know you needed.